
T-Bolt Clamps for Turbo Hoses: Sizing, Constant Tension, and Installation Guide
A loose turbo hose can turn a small sealing problem into a costly repair. Boost pressure, engine vibration, and temperature changes constantly challenge hose connections. Incorrect clamp sizing or excessive tightening can cause leaks and hose damage. T bolt clamps secure silicone and reinforced rubber hoses using wide metal bands. Standard designs provide mechanical compression, while spring-loaded versions help compensate for temperature-related changes. Neither guarantees performance without a properly matched hose and fitting. Choosing the right clamp requires more than checking its diameter. In this article, you’ll learn how to measure hoses, compare tensioning designs, and install clamps correctly. We’ll also cover sealing checks and common mistakes that affect connection reliability.

How to Choose the Correct T-Bolt Clamp Size for Turbo Hoses
Proper sizing starts at the assembled hose connection, not the pipe specification alone. A clamp must fit the hose's actual outside diameter while providing enough adjustment. Choosing by nominal pipe size can result in poor compression or limited tightening travel.
Measure the Installed Hose Outside Diameter, Not Just the Pipe Size
Turbo hoses have different dimensions depending on their materials and construction. Their internal diameter usually matches the intended pipe connection. However, wall thickness determines the outside diameter where the clamp sits.
For example, two silicone hoses may fit the same pipe diameter. One may have thicker reinforcement layers, producing a larger outside diameter. They could require different clamp sizes.
Follow these steps before selecting a clamp:
1. Confirm the pipe diameter. Check that the hose matches the intended pipe connection.
2. Install the hose fully. Push it into its correct position on the fitting.
3. Measure the outside diameter. Use a caliper or flexible measuring tape at the clamping location.
4. Check the hose profile. Look for reinforcement, raised sections, or uneven wall thickness.
5. Compare the measurement. Select a clamp whose published adjustment range covers the installed diameter.
A flexible tape can help when direct caliper access is difficult. Measure the circumference and divide it by π to estimate the diameter. Different connections may require separate measurements. The turbo outlet and intercooler inlet may use different hose constructions.
Match Clamp Adjustment Range, Band Width, and Hose Construction
The correct clamp should operate within its specified adjustment range. Avoid choosing one that barely reaches the required diameter.
An oversized clamp may reach its adjustment limit before achieving sufficient compression. An undersized clamp may damage the hose or become difficult to install. Neither provides a reliable solution.
Band width also affects sealing performance. A wider band spreads compression across a larger hose surface. However, it must fit the available sealing area.
Reinforced silicone hoses usually need careful compression control. Excessive force may deform their reinforcement layers or create permanent compression marks.
Use the following checklist when selecting a clamp.
Selection Factor | What to Check | Why It Matters |
Installed hose OD | Measure at the clamping position | Determines the required adjustment range |
Clamp adjustment range | Confirm usable tightening travel | Helps avoid poor fit and insufficient compression |
Band width | Match the available sealing surface | Supports suitable load distribution |
Hose construction | Check material and reinforcement | Reduces the risk of hose damage |
Installation clearance | Check surrounding components | Ensures access and prevents interference |
Standard vs. Constant-Tension T-Bolt Clamps: Which Works Better for Turbo Hoses?
Not every turbo hose connection requires the same clamping design. Standard clamps provide mechanical compression after tightening. Constant-tension versions add a spring mechanism to compensate for certain dimensional changes. The right choice depends on operating conditions, hose construction, and maintenance requirements.
How Temperature Cycling Affects Clamp Tension
Turbo systems experience repeated heating and cooling during operation. Metal fittings and flexible hoses respond differently to these temperature changes. Silicone and rubber hoses can expand, contract, or gradually relax under compression. These changes may affect the contact pressure between the hose and fitting.
A standard T-bolt clamp maintains its adjusted mechanical position. However, it does not automatically compensate for every change in hose thickness. Constant-tension designs include spring elements within the tightening assembly. They allow limited movement as the connection changes dimensions. This movement helps maintain clamping load during thermal cycling.
However, constant tension does not mean perfectly constant force. The spring only works within its designed compression range. Incorrect adjustment can limit or eliminate its compensation ability. These clamps still require proper sizing and installation. A spring mechanism cannot correct damaged hoses or unsuitable pipe geometry.
When to Choose Standard, Spring-Loaded, or Quick-Release Designs
Different clamp configurations serve different operating and maintenance needs.
Standard T-bolt clamps
These suit connections where conventional mechanical tightening provides adequate performance. They are practical when the hose and fitting remain dimensionally stable enough during operation.
Spring-loaded T-bolt clamps
These are useful when temperature changes and hose relaxation affect clamping load. Their spring assemblies provide limited compensation during normal dimensional movement.
Quick-release T-bolt clamps
These help simplify repeated hose removal and installation. They are useful around frequently serviced turbocharger and intercooler connections. However, quick-release construction does not automatically include constant-tension compensation.
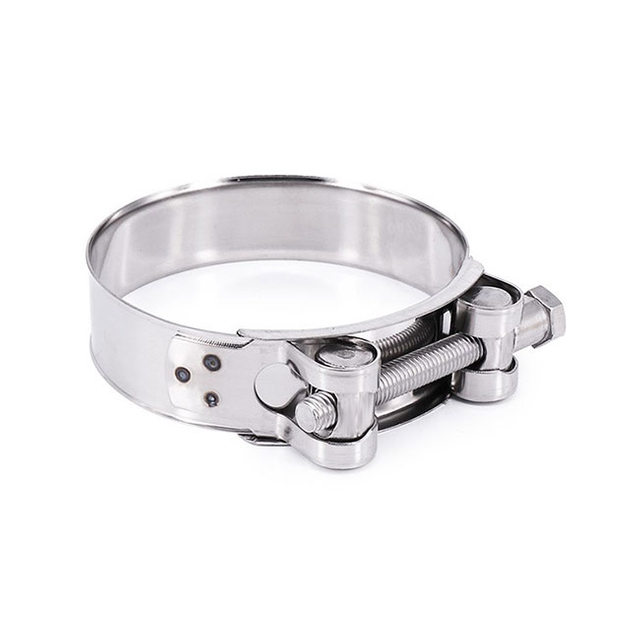
At Yueding, we supply quick-release T-bolt clamp configurations for different hose and pipe connections. We can review adjustment ranges, band widths, materials, and release mechanisms against your requirements. Select the design according to the connection's actual operating conditions. Do not assume one clamp type suits every turbo system.
Preparing Turbo Hoses and Pipe Connections Before Clamp Installation
Even correctly sized clamps cannot compensate for damaged or poorly matched connections. The hose and pipe must create a suitable sealing interface before tightening begins. Preparation also helps prevent repeated leaks and unnecessary clamp replacement.
Inspect the Hose, Fitting, and Bead Profile
Start by checking the hose for visible damage. Look for cracks, cuts, softened areas, and permanent compression marks. Reinforcement damage may also weaken its ability to maintain a secure connection.
Next, inspect the pipe surface. Remove contamination, oil residue, and loose debris according to the hose manufacturer's requirements. Check for sharp edges, corrosion, and deformation. Many turbo pipe connections include a raised bead near the pipe end. This feature helps resist hose movement when the system becomes pressurized.
However, the bead cannot secure the hose alone. The clamp must create appropriate compression on the sealing area. A damaged or poorly formed bead may reduce retention. Similarly, an oversized hose may move even when the clamp feels tight. Check that the hose seats fully without excessive stretching or distortion.
Determine the Correct Clamp Position and Installation Clearance
Clamp placement directly affects sealing and hose retention. Position the band on the intended cylindrical sealing area. For typical beaded turbo connections, this area sits behind the pipe bead. Avoid placing the band directly over the raised profile. The clamp should also remain clear of bends and irregular surfaces. These features can prevent even contact around the hose.
Before tightening, confirm the following:
The band sits fully on the intended sealing surface.
The clamp does not overlap the pipe bead.
The housing has enough clearance from surrounding components.
The tightening tool can reach the fastener safely.
The hose remains fully seated without twisting.
Avoid using a universal distance from the hose end. Different fittings require different clamping positions.
How to Install T-Bolt Clamps on Turbo Hoses Without Over-Tightening
Correct installation requires controlled tightening rather than maximum tightening force. Excessive compression can damage hoses, deform fittings, and weaken the connection. Follow the clamp manufacturer's instructions whenever model-specific installation settings are available.
Step-by-Step Installation and Tightening Procedure
A consistent installation method helps prevent common fitting mistakes.
1. Allow the system to cool. Avoid working around hot turbocharger components.
2. Inspect the connection. Confirm that the hose and fitting are clean and undamaged.
3. Position the clamp. Slide the correctly sized clamp onto the hose.
4. Seat the hose. Push it fully onto the pipe fitting.
5. Align the band. Place it on the designated sealing surface behind the bead.
6. Orient the housing. Ensure adequate clearance and tool access.
7. Tighten gradually. Keep the band aligned while applying compression.
8. Follow the specified setting. Use the manufacturer's torque or spring-compression instructions.
9. Inspect the assembly. Check for distortion, uneven contact, and interference.
A calibrated torque wrench helps improve consistency when a specified torque is available. However, torque requirements vary between clamp models and hose assemblies. Never assume that one tightening value applies to every clamp.
Band design, fastener construction, and hose properties all affect installation requirements. After tightening, check that the band remains properly seated. The hose should not show excessive bulging or deep compression marks.
Avoid Over-Tightening, Uneven Compression, and Incorrect Spring Adjustment
Over-tightening is a common cause of installation problems. It may appear to improve retention initially. However, excessive compression can damage the hose beneath the band. Silicone reinforcement may deform under concentrated pressure. Thin-wall metal fittings can also lose their original shape.
Watch for these warning signs:
Deep marks along the clamp band edges.
Excessive hose bulging beside the band.
Distorted clamp hardware or damaged threads.
Uneven compression around the connection.
A spring compressed beyond its specified installation condition.
Spring-loaded clamps require particular attention. Their springs need sufficient remaining travel for tension compensation. Fully compressing a spring may prevent further movement. Always follow the specified spring height or adjustment method.
Quick-release mechanisms also require correct engagement after servicing. Confirm that the locking structure is secure before operating the system. If hardware becomes permanently distorted, replace it. Additional tightening cannot restore damaged components.
How to Check T-Bolt Clamps for Boost Leaks and Hose Retention Problems
A properly installed clamp should help maintain sealing and hose retention. However, leaks can still develop from damaged hoses, poor fitting geometry, or incorrect installation. Effective troubleshooting begins by identifying the actual failure location.
Identify Leakage, Hose Movement, and Clamp-Related Problems
Boost leaks may produce several noticeable symptoms. Drivers sometimes hear hissing during acceleration or notice reduced engine response. Oil residue can also appear near charge-air connections. This may indicate escaping air carrying oil mist from the intake system.
Common warning signs include:
Hissing or escaping-air sounds during boost.
Visible hose movement or partial separation.
Oil residue around the hose connection.
Lower measured boost than the commanded level.
Repeated loosening after heating and cooling cycles.
These symptoms do not always indicate clamp failure. Intercooler damage, split hoses, and other intake leaks can produce similar results. Separate problems into three categories during inspection.
Incorrect clamp sizing: The band cannot provide suitable compression within its adjustment range.
Installation errors: The clamp is misaligned, incorrectly positioned, or improperly tightened.
Connection damage: The hose, fitting, or bead cannot support reliable sealing.
Repeated tightening without identifying the cause may worsen hose damage.
Verify Sealing Performance and Decide When Replacement Is Necessary
A controlled charge-air pressure test can help locate leaks. Use suitable testing equipment and follow the system manufacturer's pressure limits. Never exceed the permitted test conditions. Excessive test pressure may damage hoses or other components.
During inspection, check for escaping air around the hose-to-fitting interface. Also examine nearby joints before blaming the clamp. After testing, confirm that the hose remains fully seated. Inspect the band position and fastener condition.
Some applications may require inspection after initial operation or service cycles. Follow the applicable maintenance instructions rather than assuming a universal retightening interval.
Replace clamps when they show damaged threads, permanent deformation, severe corrosion, or defective release mechanisms. Damaged springs can also prevent proper tension compensation.
However, clamp replacement is not always the correct repair. A worn hose or damaged pipe bead may require replacement first. A secure installation must provide both reliable sealing and adequate hose retention. These conditions should be verified under the intended operating requirements.
Conclusion
Choosing the right T-bolt clamps starts with measuring the installed hose diameter. Proper adjustment range and band width help ensure secure connections. Standard clamps suit stable connections, while spring-loaded designs help compensate for temperature changes. Quick-release versions simplify frequent hose servicing. Reliable sealing also depends on hose condition, fitting geometry, and correct installation. If leaks persist, inspect the connection before increasing tightening force. Zhejiang Yueding Corrugated Tube Co., Ltd. offers T-bolt clamp solutions for different installation requirements. Our products support secure fastening, easier maintenance, and reliable turbo hose connections.
FAQ
Q: How Do I Choose the Right Size T Bolt Clamps for Turbo Hoses?
A: Measure the hose's outside diameter after installing it on the pipe. Select t bolt clamps whose adjustment range covers this measurement. Check band width and available installation space.
Q: Are Constant-Tension T Bolt Clamps Better for Turbo Hoses?
A: Constant-tension t bolt clamps use springs to compensate for temperature-related hose movement. They are useful during repeated heating and cooling, but proper sizing and installation remain essential.
Q: How Tight Should T Bolt Clamps Be on Silicone Turbo Hoses?
A: Tighten t bolt clamps according to the manufacturer's specified torque or spring setting. Excessive tightening can damage silicone reinforcement, deform fittings, and create sealing problems.
Q: Why Do Turbo Hoses Still Leak After Installing T Bolt Clamps?
A: Boost leaks may result from incorrect clamp sizing, poor positioning, damaged hoses, or worn fittings. Inspect the entire connection and perform a controlled leak test before tightening further.
Q: What Is the Difference Between Standard and Quick-Release T-Bolt Clamps?
A: Standard clamps provide secure mechanical fastening. Quick-release designs simplify frequent hose removal and maintenance. Neither automatically compensates for thermal expansion unless equipped with a suitable spring mechanism.




About Yueding
YUEDING manufactures stainless steel exhaust flexible connectors, clamps, metal bellows, and selected automotive exhaust components under ISO and IATF quality systems. With in-house production, inspection, and packaging capabilities, we support bulk orders, standard-size inventory, and customized branding for global B2B customers.
Reliable Delivery
Stable production planning, standard-size inventory, and batch shipping support help make delivery more predictable.

Factory Direct
Production, inspection, and packaging are managed in-house, making communication, quality control, and customization more efficient.

Integrated Supply
We supply flex pipes, clamps, metal bellows, and selected exhaust components to support related purchasing needs from one manufacturer.

