How to Fix Exhaust Clamp Leak?
Is that annoying hissing sound ruining your drive? Your exhaust system must treat harmful gases before releasing them safely. An Exhaust Clamp is vital for maintaining this gas-tight seal. Learn how to identify and replace a faulty clamp to restore vehicle performance.
Key Takeaways
● Crucial Safety Role: The exhaust system expels and treats harmful combustion gases ; a failed Exhaust Clamp can allow toxic carbon monoxide to enter the vehicle cabin.
● Early Detection Signs: Identifying a leak early through hissing noises , unusual vibrations , or the smell of gas can prevent expensive engine damage.
● Material Selection: Corrosion from moisture and road salt is a primary cause of clamp failure ; choosing high-quality materials like stainless steel helps prevent rust.
● Financial Impact: Neglecting a leaking Exhaust Clamp leads to higher fuel consumption and may result in failing a smog check or paying fines for emissions violations.
● Precision Installation: A successful repair requires thoroughly cleaning joint surfaces with a wire brush and ensuring all components are seated securely for a gas-tight seal.

Diagnosing a Leaking Exhaust Clamp
Detecting a leak often starts with your senses. Because the Exhaust Clamp is a mechanical connection point, it is frequently the first place a leak occurs due to corrosion or physical impact. Identifying these issues early prevents further damage to your vehicle.
● Auditory Cues: Listen for unusual sounds such as hissing, tapping, or popping coming from the exhaust area. An excessively loud exhaust note often indicates a clamp has loosened or failed.
● Visual Inspection: Look for black soot or visible cracks along the exhaust components and around the clamp itself. Heavy rust caused by moisture and road salt is a frequent culprit for clamp failure.
● Performance Red Flags: If your vehicle struggles to accelerate or feels sluggish, it might be due to a leak at the Exhaust Clamp. Unusual vibrations, especially when accelerating, are common symptoms of a compromised connection.
● Odors: A strong odor of gas or exhaust fumes around the vehicle suggests a leak. If you notice these odors, investigate immediately as they contain toxic gases like carbon monoxide.
Note: If you notice exhaust odors in the cabin, it is crucial to investigate further as they are harmful to your health.
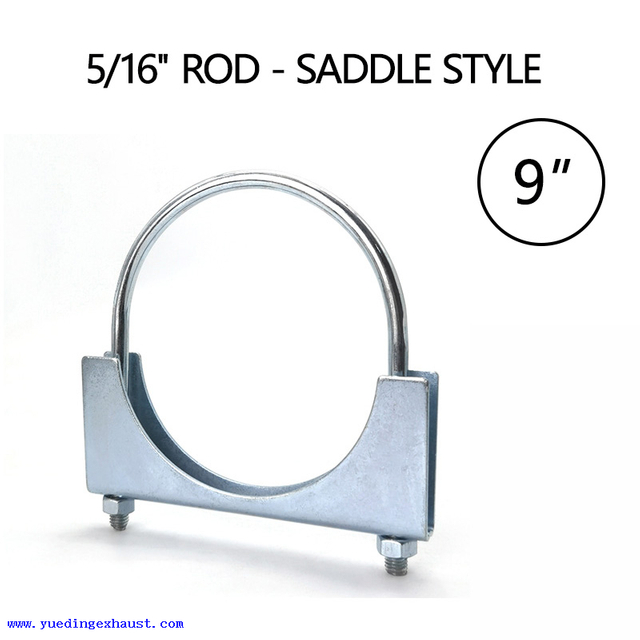
Choosing the Right Exhaust Clamp for Your Repair
Selecting the correct Exhaust Clamp is essential for a permanent fix. Using the wrong type can lead to crushed pipes or a recurring leak.
Clamp Type | Best Use Case | Pros | Cons |
U-Bolt Clamp | Budget repairs; heavy-duty pipes | High clamping force; inexpensive | Can crimp/deform pipes; prone to rust |
Band Clamp | Lap joints or butt joints | Even 360-degree pressure; won't deform pipes | More expensive than U-bolts |
V-Band Clamp | Performance or racing systems | Fast removal; excellent high-pressure seal | Requires welding flanges to pipes |
When sizing your Exhaust Clamp, you must measure the outside diameter (OD) of your exhaust pipe. Most passenger vehicles use 2-inch to 3-inch diameters. For material, stainless steel is the professional choice as it resists the rust and corrosion that typically destroy galvanized alternatives. Ensure you identify if you have a lap joint (one pipe inside another) or a butt joint (pipes meeting end-to-end), as this dictates whether you need a specialized sleeve-style Exhaust Clamp.
Comprehensive Guide: How to Replace a Leaking Exhaust Clamp
Replacing a leaking Exhaust Clamp is a manageable DIY task that prevents higher fuel consumption and emission failures. Follow these steps for a professional-grade repair.
Step 1: Preparation and Safety Always prioritize safety. Ensure the vehicle is securely lifted on jack stands and the exhaust system is completely cool to the touch.
Step 2: Penetrating Oil ApplicationLocate the source of the leak, whether it is from the manifold or the joints. Pre-soak the clamp bolts with penetrating oil at least a day before you plan to work on them. This makes them significantly easier to remove without snapping.
Step 3: Removing the Damaged ClampCarefully loosen the bolts. If you encounter heavy resistance, tighten the bolt by a 1/4 turn, apply more oil, and then try loosening again. Repeat this until the hardware is removed. For severely seized U-bolts, you may need a reciprocating saw to cut the old clamp off.
Step 4: Surface RemediationThoroughly clean the area around the joint. Use a scraper or wire brush to remove old soot, rust, and old gasket material. For a truly effective clean, a wire brush attachment on a drill works best.
Step 5: Positioning the New Exhaust Clamp Slide the new Exhaust Clamp over the pipe before aligning the joint. Position it so it covers the connection point equally. If the component is clamped, ensure the new hardware is seated on a clean, smooth surface.
Step 6: Torquing to SpecTighten the nuts in an alternating pattern to ensure the Exhaust Clamp applies even, 360-degree pressure. Avoid over-tightening U-bolts, which can crush the pipe and make future repairs impossible.
Step 7: The Final Leak CheckDouble-check all connections. Start the engine and listen for any hissing or popping to ensure the repair was successful.
Tip: Applying a small amount of high-temperature exhaust sealant to the pipe joint before sliding the Exhaust Clamp into place can help fill minor pits in the metal caused by corrosion.
Essential Tools and Materials for Clamp Repair
Having the right tools is key for a successful DIY repair. Working on exhaust systems often requires more torque and better cleaning tools than standard mechanical work.
● Socket Sets and Breaker Bars: You will need deep-well sockets to reach over long clamp bolts. A breaker bar provides the leverage necessary to snap the rust bond on old hardware.
● Wire Brushes and Scrapers: These are non-negotiable for cleaning the joint area. Without a clean surface, the new Exhaust Clamp cannot create a gas-tight seal.
● Rust Penetrants: Professional-grade penetrating oils are superior to standard lubricants because they "wick" into the threads of rusted bolts.
● Safety Gear: Always wear eye protection. Rust flakes and soot will fall as soon as you begin cleaning the pipes.
Note: If the repair involves replacing a muffler or catalytic converter along with the clamp, determine if the component is clamped, bolted, or welded before you begin.
Troubleshooting Stubborn Exhaust Clamp Issues
Sometimes, a simple replacement becomes difficult due to years of heat and road salt.
Dealing with Frozen BoltsWhen bolts won't budge, the "Tighten-then-Loosen" method is your best friend. This rhythmic movement breaks up the rust inside the threads better than raw force.
Correcting Out-of-Round Pipes
If a previous U-bolt clamp was over-tightened, it might have "crimped" the pipe into an oval shape. You may need an exhaust pipe expander tool to round the pipe back out so the new Exhaust Clamp can seal properly.
Heat Cycling for Sealing
After installing a new clamp, the metal will expand as it heats up. It is wise to re-check the tightness of the clamp bolts after the first 50 miles of driving to ensure they haven't loosened during these thermal cycles.
Temporary FixesIf you cannot replace the clamp immediately, you can use exhaust tape or epoxy bonds as a temporary fix. Clean and smooth the leaking surfaces first, then apply an aluminum patch to strengthen the bond.
Tip: For industrial or high-mileage B2B vehicles, avoid temporary tapes and epoxies; they rarely last more than a few days under high vibration and usually make the eventual permanent repair more difficult to clean.
The Risks of Ignoring a Faulty Exhaust Clamp
Neglecting an exhaust leak can lead to several serious problems. While a loose clamp might seem like a minor noise issue, the consequences affect safety, finances, and the environment.
● Cabin Safety: Leaks can introduce toxic fumes like carbon monoxide into the cabin. This leads to headaches, dizziness, nausea, and can trigger breathing problems for those with asthma.
● Emissions Failures: Leaks prevent the catalytic converter from filtering pollutants correctly. This leads to higher emissions, which can cause you to fail a smog check or emissions test, resulting in fines or registration issues.
● Component Wear: A leak at the Exhaust Clamp disrupts the air-fuel mixture because oxygen sensors don't get an accurate reading. This leads to inefficient combustion and potential mechanical failures.
● Environmental Impact: Driving with a leaking exhaust contributes to noise, air, and water pollution.
Note: Most regions have strict emissions standards; an unaddressed leak is a quick way to incur legal repercussions.
Conclusion
Identifying exhaust leak symptoms is vital for your vehicle's safety and health. By selecting a high-quality Exhaust Clamp and following proper installation steps, you can avoid costly future repairs. Always prioritize timely fixes to mitigate health hazards and performance issues. For reliable solutions, yuedingexhaust offers durable products that ensure a gas-tight seal. Their precision-engineered components provide lasting value for every DIY project.
FAQS
Q: Why is a high-quality Exhaust Clamp important?
A: A durable Exhaust Clamp maintains the system's structural integrity and ensures a gas-tight seal at pipe joints.
Q: How do I identify an Exhaust Clamp leak?
A: Listen for hissing or tapping sounds and check for black soot or rust around the Exhaust Clamp area.
Q: Can a loose Exhaust Clamp affect fuel efficiency?
A: Yes, a leaking Exhaust Clamp causes inefficient combustion, which leads to dropped efficiency and rising fuel consumption.
Q: Is it safe to ignore an Exhaust Clamp leak?
A: No, a failed Exhaust Clamp can allow toxic carbon monoxide to leak into the cabin, posing serious health risks.


About Yueding
YUEDING manufactures stainless steel exhaust flexible connectors, clamps, metal bellows, and selected automotive exhaust components under ISO and IATF quality systems. With in-house production, inspection, and packaging capabilities, we support bulk orders, standard-size inventory, and customized branding for global B2B customers.
Reliable Delivery
Stable production planning, standard-size inventory, and batch shipping support help make delivery more predictable.

Factory Direct
Production, inspection, and packaging are managed in-house, making communication, quality control, and customization more efficient.

Integrated Supply
We supply flex pipes, clamps, metal bellows, and selected exhaust components to support related purchasing needs from one manufacturer.

