Do Exhaust Clamps Leak?
Are you hearing a suspicious hissing sound from under your car? While many drivers ask, "Do exhaust clamps leak?" the truth is they shouldn't. This guide explores why leaks occur and how to stop them. You will learn to choose and install the best exhaust clamps for a permanent seal.
Key Takeaways
● Root Causes of Leaks: Most leaks stem from thermal expansion cycles, improper sizing, or surface irregularities on the exhaust pipes.
● Selection Matters: While U-bolts are common, Exhaust Clamps like band or V-band styles offer superior sealing by distributing pressure evenly.
● Material Integrity: Opting for 304 stainless steel Exhaust Clamps ensures maximum corrosion resistance and long-term durability in harsh environments.
● Precision Installation: Achieving a gas-tight seal requires thorough surface cleaning, high-temp paste, and strict adherence to torque specifications.
● Proactive Maintenance: Implementing a re-torque protocol after the first 100 miles can prevent Exhaust Clamps from loosening over time.

Why Exhaust Clamps Leak: Identifying the Root Causes
Even high-quality exhaust clamps can fail if environmental and mechanical factors aren't managed. The most common culprit is thermal cycling. As your exhaust reaches temperatures exceeding 500°C and subsequently cools, the metal expands and contracts. This constant movement can cause lower-grade clamps to stretch or lose their initial tension, creating a microscopic path for gases to escape.
Improper sizing remains a frequent mistake in both DIY and professional settings. A mere 0.25-inch discrepancy between the pipe diameter and the clamp size prevents the hardware from applying uniform circumferential pressure. Instead of a seal, you get "sooting"—black carbon deposits that signal a persistent leak. Furthermore, surface irregularities like rust scales or burrs on the pipe act as spacers, keeping the clamp from making full contact with the metal.
Installation errors also play a massive role. Over-tightening can crush or "egg" the exhaust pipe, making it impossible to achieve a seal even with a new clamp later. Conversely, under-tightening allows the joint to shift under vehicle vibration. Using low-quality hardware, such as budget-grade bolts that shear under high heat, further guarantees a future failure.
Note: Proper alignment is crucial; if a clamp is not perfectly centered over the pipe joint, pressure distributes unevenly, leading to a "half-moon" leak pattern.
Comparing Sealing Performance Across Different Exhaust Clamps
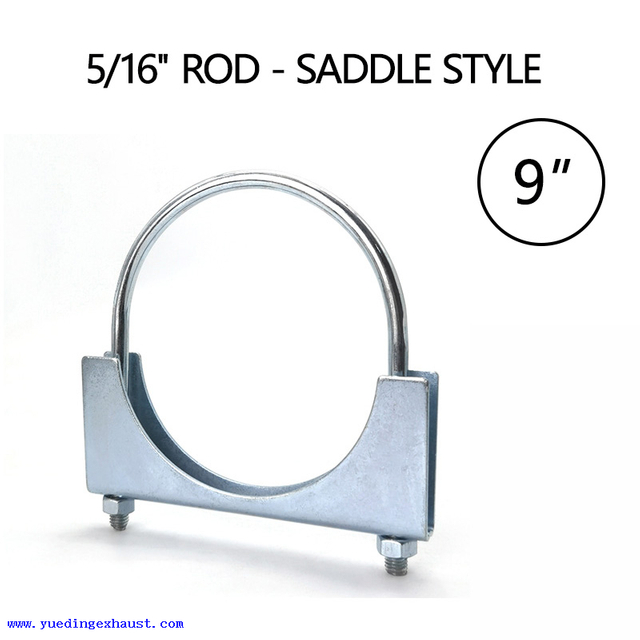
Not all exhaust clamps are created equal. The traditional U-bolt clamp is perhaps the most prone to leaking. Because it concentrates force on two small points, it often crimps the pipe into an oval shape rather than sealing the perimeter. While inexpensive, they are generally considered "one-time use" because removing them often requires cutting the deformed pipe.
Band clamps offer a significant upgrade. Lap joint band clamps are designed to join two pipes of different diameters (where one slides inside the other), while butt joint band clamps connect two pipes of the same diameter. These clamps distribute pressure over a wide surface area, drastically reducing the risk of leaks and pipe deformation.
For high-performance or turbo-charged applications, V-band clamps are the gold standard. They utilize a flanged system and a deep-grooved clamp to create a mechanical lock. They provide a 100% gas-tight seal and are easily removable for frequent maintenance. Another specialized option is the Torca-style coupler, which uses a high-force reaction block to bridge gaps and prevent bypass in heavy-duty industrial systems.
Clamp Type | Best For | Seal Integrity | Removability |
U-Bolt | Budget repairs | Low | Poor |
Lap Joint Band | Slip-fit pipes | Medium-High | Excellent |
Butt Joint Band | Same-diameter pipes | Medium-High | Excellent |
V-Band | Performance/Turbo | High | Superior |
Symptoms of a Leaking Exhaust Clamp Connection
Detecting a leak early prevents expensive damage to oxygen sensors and catalytic converters. The most immediate sign is an audible "ticking" or "hissing" sound that increases in frequency with engine RPM. This sound is actually the high-pressure exhaust gas forcing its way through a narrow gap in the exhaust clamps.
Visual cues are equally telling. Look for black soot patterns, often called "carbon tracking," around the clamp area. If you see grey or black dust on nearby chassis components, the clamp has failed. In some cases, a leak near the O2 sensor introduces "false air" into the system. This tricks the ECU into thinking the engine is running lean, leading to poor fuel trim, decreased MPG, and a "Check Engine" light.
Physical vibrations can also signal a loose connection. If the exhaust system feels excessively shaky or if you hear a metallic rattle, the exhaust clamps may have lost their clamping force, allowing the pipes to rub against one another rather than staying fused.
Note: Exhaust leaks can allow carbon monoxide to enter the vehicle cabin; never ignore a hissing sound near the floorboards.
Professional Installation Techniques for a Leak-Proof Seal
A leak-proof seal starts long before you tighten the bolt. Surface preparation is mandatory. Use a wire brush or emery cloth to remove all rust, old sealant, and carbon buildup from the pipe ends. If the metal is pitted, the exhaust clamps won't be able to compress the pipe enough to fill those microscopic voids.
Many professionals use high-temp exhaust paste as an added insurance policy. Applying a thin bead of this sealant to the male end of the pipe before sliding the joint together fills any remaining imperfections. However, do not over-rely on paste; it is a supplement to, not a replacement for, proper clamping force.
Always use a torque wrench. Impact guns are convenient but notoriously inaccurate, often leading to stripped threads or crushed pipes. Check the manufacturer's specifications for the specific exhaust clamps you are using. Finally, implement a "re-torque protocol." After the vehicle has gone through several heat cycles (roughly 50 to 100 miles), check the bolts again. Thermal expansion often creates a slight looseness that a quick half-turn can fix permanently.
Tip: When installing band clamps, ensure the "reaction block" is positioned away from any potential impact points or tight clearances to avoid rattling.
Troubleshooting: How to Fix a Leaking Clamp Without Replacing the Pipe
If you discover a leak, you don't always need to replace the entire exhaust section. Start by loosening the exhaust clamps and repositioning them. Sometimes, road vibrations cause a clamp to "walk" or shift off-center. Simply sliding it back to the middle of the joint and re-torquing can solve the issue.
For joints where the pipes have become slightly deformed or thin, consider a sleeve intervention. An exhaust sleeve or coupler is a larger metal tube that slides over both pipes, providing a fresh, smooth surface for new exhaust clamps to grab onto. This is a common fix in B2B fleet environments where downtime must be minimized.
If the clamp itself is in good shape but the bolt is rusted and won't tighten, perform a hardware upgrade. Replace standard bolts with Grade 8 steel or stainless steel fasteners. This allows you to apply the necessary torque to stop the leak without the risk of the hardware snapping during installation.
Tip: If a minor leak persists after tightening, try wrapping the joint in specialized exhaust repair tape before applying the band clamp for an airtight "sandwich" seal.
Durability and Material Selection: Stainless vs. Galvanized
Material choice dictates how long your exhaust clamps will remain leak-free. Galvanized steel is the budget choice, but it is highly susceptible to road salt and moisture. Once the zinc coating wears off, the clamp rusts, loses tension, and eventually snaps.
For long-term reliability, stainless steel is the standard. However, there is a difference between 409 and 304 grades. 409 stainless is commonly used in OEM applications; it is durable but will develop surface rust. 304 stainless steel contains higher levels of chromium and nickel, making it nearly impervious to corrosion. It also has a thermal expansion rate that closely matches high-end aftermarket exhaust systems, ensuring the seal remains tight even as temperatures fluctuate.
While premium exhaust clamps carry a higher upfront cost, they offer significantly better ROI. They prevent the need for repetitive labor and protect more expensive components like mufflers and resonators from the acidic effects of localized exhaust leaks.
Note: In "salt belt" regions, 304 stainless steel hardware is the only way to ensure a clamp can be removed and reused years later.
When to Abandon the Clamp: Clamping vs. Welding
There comes a point where even the best exhaust clamps cannot save a failing joint. Clamping is preferred for its flexibility; it allows for DIY repairs, modular upgrades, and easier maintenance. It also provides a small degree of vibration damping, as the mechanical joint can absorb some of the engine's harmonics that a rigid weld might not.
Welding is the solution for permanence. If the pipe ends are too thin from corrosion or if the gap is too wide to bridge, a professional weld creates a singular, unbreakable piece of metal. However, welding is permanent. If you need to replace a muffler later, you'll be reaching for a saw instead of a wrench.
Choose welding for "set and forget" systems on heavy-duty equipment where accessibility isn't a concern. Choose high-quality exhaust clamps for passenger vehicles, performance cars, and any situation where future serviceability is a priority.
Conclusion
Exhaust clamps may leak from thermal stress or poor installation, but they remain highly effective sealing tools. By choosing premium 304 stainless steel and following correct torque steps, you ensure long-term system safety. yuedingexhaust provides high-performance clamps designed for superior durability and precision fit. Their products offer reliable value by preventing leaks even in the harshest driving conditions. Matching the right clamp to your joint ensures a professional, gas-tight finish every time.
FAQS
Q: Why do my exhaust clamps leak after installation?
A: Leaks often occur due to thermal expansion, incorrect sizing, or uneven torque application on the pipe.
Q: How can I prevent exhaust clamps from failing?
A: Use high-temp sealant and 304 stainless steel exhaust clamps to resist corrosion and heat cycles.
Q: Are band-style exhaust clamps better than U-bolts?
A: Yes, band exhaust clamps provide superior sealing by distributing pressure evenly without deforming the exhaust pipes.
Q: Can I fix leaking exhaust clamps without replacement?
A: Try cleaning the pipe surface and re-torquing the exhaust clamps after a few heat cycles.


About Yueding
YUEDING manufactures stainless steel exhaust flexible connectors, clamps, metal bellows, and selected automotive exhaust components under ISO and IATF quality systems. With in-house production, inspection, and packaging capabilities, we support bulk orders, standard-size inventory, and customized branding for global B2B customers.
Reliable Delivery
Stable production planning, standard-size inventory, and batch shipping support help make delivery more predictable.

Factory Direct
Production, inspection, and packaging are managed in-house, making communication, quality control, and customization more efficient.

Integrated Supply
We supply flex pipes, clamps, metal bellows, and selected exhaust components to support related purchasing needs from one manufacturer.

